The Ultimate RV Off-Grid Power Guide

Forget about messy wires and build a simple, modern electrical system for your campervan or off-grid cabin that’s easy to set up and use.
Table of Contents
- Introduction: The New Era of Off-Grid Living
- Chapter 1: The Power Audit (Sizing Your System)
- Chapter 2: The Heart of Your System
- Chapter 3: Harnessing the Sun (Solar Power Made Simple)
- Chapter 4: The Build (Wiring, Fuses & Keeping It Safe)
- Chapter 5: Top Appliance Recommendations
- Estimated Cost Breakdown
- Quick Start Checklist
- Troubleshooting FAQ
- Conclusion: Your Off-Grid Journey Starts Here
Introduction: The New Era of Off-Grid Living
If you’re planning an off-grid adventure, like building a campervan, setting up an RV, or creating a remote cabin, you’ve probably watched a lot of YouTube videos about electrical systems. Most people finish those videos feeling completely overwhelmed.
In the past, building an off-grid electrical system meant learning a lot about wiring. You had to buy heavy lead-acid batteries, complicated solar controllers, large inverters, and spend days connecting wires, hoping everything would work safely.
Luckily, things are much easier now.
Now, we have “Smart Power Stations.” Brands like EcoFlow, Bluetti, and Jackery have made off-grid living easier by combining the battery, inverter, and solar controller into one portable box.
This guide keeps things simple. You’ll learn how to figure out your power needs, choose the right plug-and-play power station, charge it while you drive, and connect it to solar panels. You don’t need an engineering degree.
Let’s get started.
Chapter 1: The Power Audit (Sizing Your System)
A common and expensive mistake is buying electrical gear before you know how much power you actually need.
- If your system is too small, your fridge might shut off in the middle of the night, spoiling your food.
- If it’s too big, you’ll waste money and add unnecessary weight to your vehicle.
To choose the right system, you’ll need to do a Power Audit.
Step 1: Learn the Lingo (Keep it Simple)
Before we begin, you only need to know two terms:
Watts (W): This is the amount of power an appliance uses at any moment. It is like a car’s speed. For example, a travel kettle uses 1000W.
Watt-hours (Wh): This is the capacity, or the amount of power you use over time. It is like the distance a car has travelled. For example, if you run a 1000W kettle for 1 hour, you have used 1000Wh of energy.
Key Point: When shopping for a power station, Watt-hours (Wh) is like the size of your fuel tank. That’s the number you should focus on.
Step 2: Calculate Your Daily Consumption
Grab a pen and paper. List every electrical item you’ll use in a day. Next to each one, write its wattage (check the plug sticker) and how many hours you’ll use it.

Multiply the watts by the hours for each item to find your daily Watt-hours (Wh).
| Appliance | Watts | Hours | Daily Wh |
| Smartphone Charger | 15W | 2 hours | 30Wh |
| LED Campervan Lights | 15W | 4 hours | 60Wh |
| Starlink Mini | 30W | 6 hours | 180Wh |
| 12V Compressor Fridge | 50W | 8 hours* | 400Wh |
Note: Fridges turn on and off to keep cool, so they usually use power for about 8 hours a day, not 24.
Total Daily Consumption = 670Wh per day.
Step 3: The “Inverter Tax” (Crucial Step!)
If you get a 670Wh battery, it won’t last all day. This is because converting 12V battery power to 230V household power uses an inverter, and inverters lose about 15% of the energy as heat.
To avoid running out of power, add a 15% safety margin to your total.
Just take your daily total and divide it by 0.85:
670Wh / 0.85 = 788Wh
Your Magic Number: To run your setup comfortably, choose a power station with at least 788Wh of capacity.
The Easy Way Out: Use Our Free Calculator!
If you don’t want to do the math, we’ve made an interactive calculator that does it for you. Just visit our Interactive Off-Grid Power Calculator, select the appliances you use, and the tool will add safety margins and suggest the best power stations for you.
Chapter 2: The Heart of Your System (Hubs, Stations & Alternator Charging)
For years, the best way to build a campervan electrical system was to buy a bunch of separate parts: a battery, an inverter, a solar charge controller, a DC-DC charger, a fuse block, and lots of thick copper wire.
You would mount everything on a piece of plywood, often called a “Victron board,” and then spend days wiring it all together safely.
If you’re an electrician, this might be a fun weekend project. But for beginners, it can feel overwhelming.

Now, you can skip the plywood board. Most people use All-In-One Power Stations and Smart Power Hubs instead.
These units combine all those complicated parts into one safe, enclosed box. Depending on your travel style, you have two main options.
Route A: The Portable Power Station (Best for Most Users)

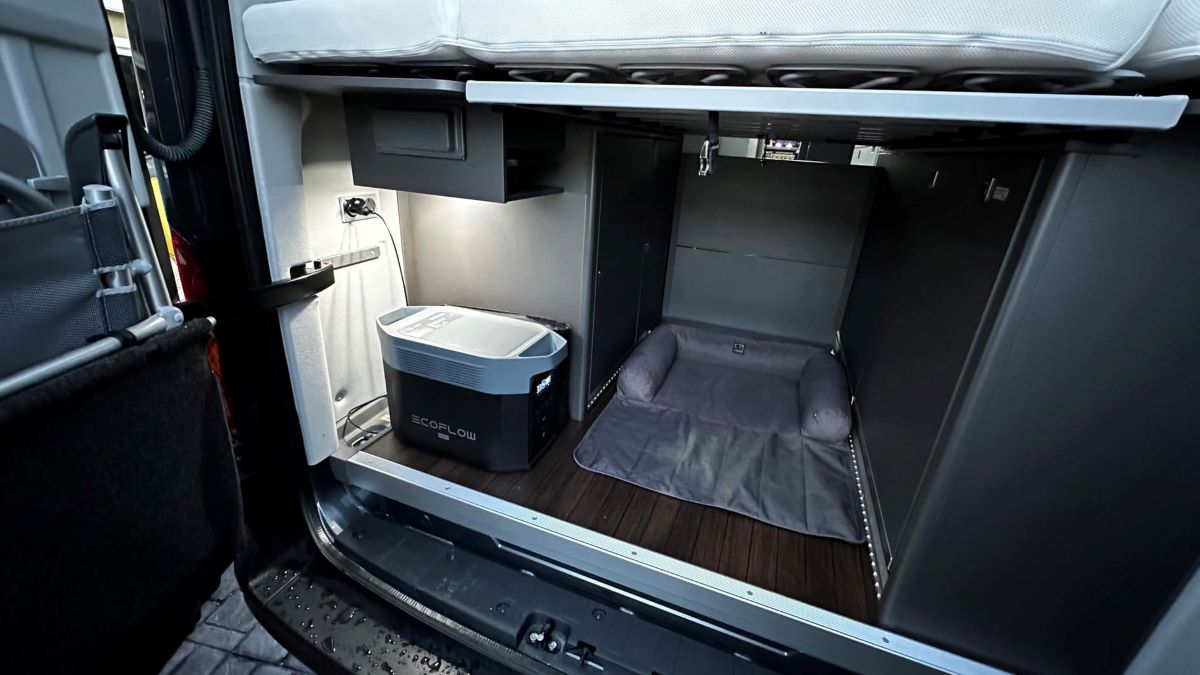
If you are building a weekend camper or a mid-sized van, a regular Portable Power Station from a trusted brand like EcoFlow, Bluetti, or Jackery will do the job.
These units fit neatly under a bench seat or in the boot. You just plug your 230V appliances into the front sockets, like you would at home, and your 12V appliances, such as your fridge or diesel heater, into the DC ports.
Benefits:
- The best part is there’s no installation needed. If you sell your van, just unplug the power station and use it at home during a power cut.
- Top picks: For most van lifers, the EcoFlow DELTA 2 or the Bluetti Elite 100 V2 offer the ideal 1000Wh capacity for running a mobile office and a compressor fridge.
Route B: The Smart Power Hub (The Full-Time Solution)
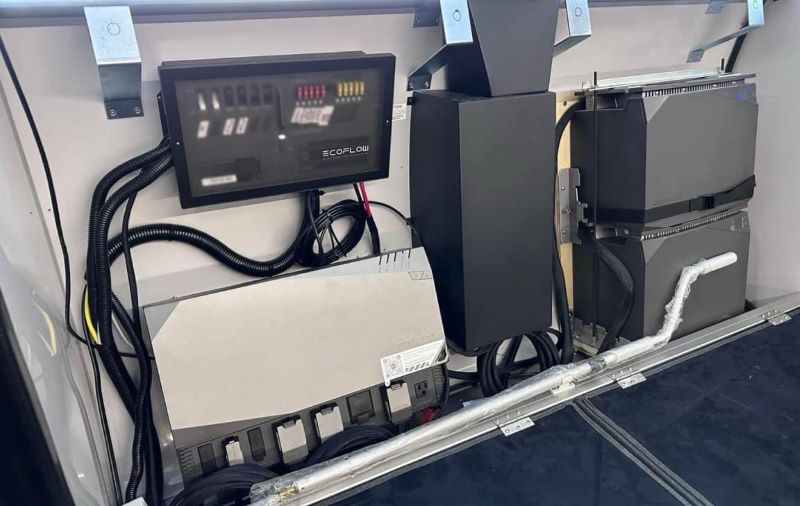
If you are building a large, full-time off-grid motorhome and want your plugs built into the van’s walls, you will need a Power Hub.
Instead of using a portable box, systems like the EcoFlow Power Kits or Bluetti Power Hubs serve as the main control centre for your van.
They have a main distribution panel that makes it easy to connect all your interior lights, wall sockets, and water pumps.
Advantages:
- You get the clean, built-in look of a traditional DIY system, but with easy plug-and-play cables that snap together.
- You don’t need to crimp wires or deal with exposed wiring.
- You can even monitor every fuse and light switch from a smartphone app.
The Game Changer: DC-DC Alternator Chargers
No matter which option you choose, you’ll need to recharge your battery at some point. Solar panels help, but in the cloudy UK, they aren’t always reliable in winter.
The best way to charge your off-grid system is by using your van’s engine while you drive. In the past, this meant wiring a complicated split-charge relay.
Now, brands offer dedicated Alternator Chargers that connect directly to your vehicle’s starter battery and safely deliver ample power to your power station while you drive.
EcoFlow 800W Alternator Charger Installation:

Step 1. Connect the fuse cable to the input cable on one end.
Step 2. Connect the fuse cable to the vehicle battery on the other end.
Step 3. Connect the black cable to the chassis terminal.
Step 4. Thread the other end of the input cable through the vehicle body towards the charger. If the input cable is bulky or difficult to pull through, disconnect the cable ends before threading.
Step 5. Plug the other side of the input cable into the EcoFlow 800W Alternator Charger.
Step 6. Plug in the output cable from the EcoFlow 800W Alternator Charger to the portable power station.
This powerful device can send 800 watts directly to an EcoFlow DELTA series power station. A one-hour drive adds 800 Wh to your battery, which is enough to run a compressor fridge for two days.
Alternative Options:
- Bluetti Charger 2: Bluetti’s version also provides fast charging for their heavy-duty units, so you can arrive at your destination with a fully charged battery, no matter the weather.
By pairing a modern Power Station with a dedicated Alternator Charger, you’ll have a reliable electrical system that works better than older setups and is much quicker to install.
Chapter 3: Harnessing the Sun (Solar Power Made Simple)
You’ve figured out your power needs and picked the right power station. But for now, it’s just a big, heavy battery. Once it runs out, you have no power.
To turn it into a true off-grid solar generator that gives you free electricity wherever you park, you’ll need to connect it to solar panels.
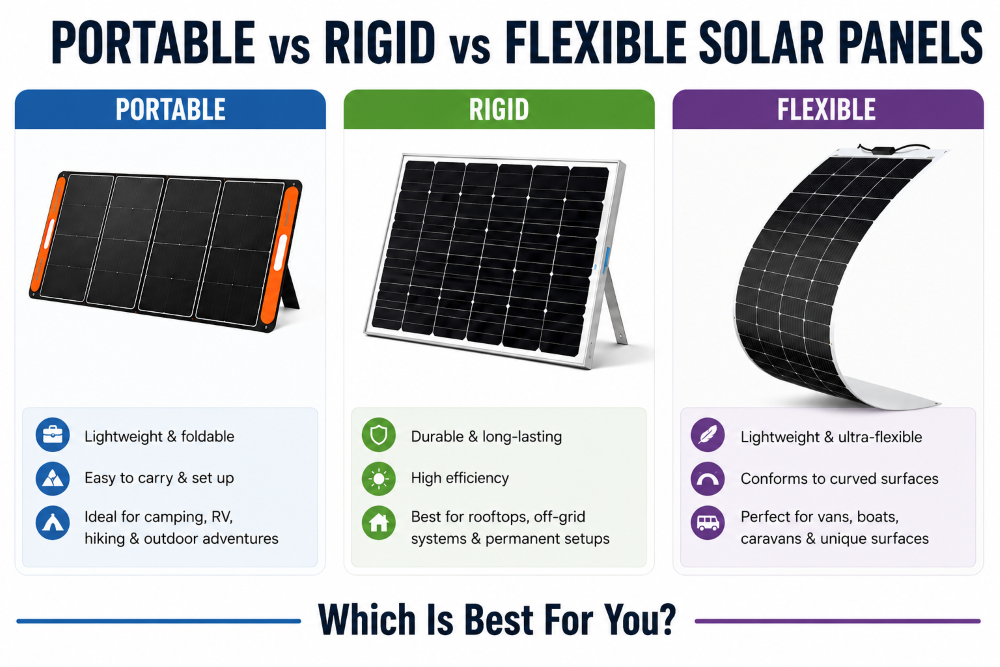
When shopping for solar panels, you’ll see three main types. Picking the wrong one could affect your van’s aerodynamics, lower your energy on cloudy days, or cost you more than needed.
1. Portable (Folding) Solar Panels
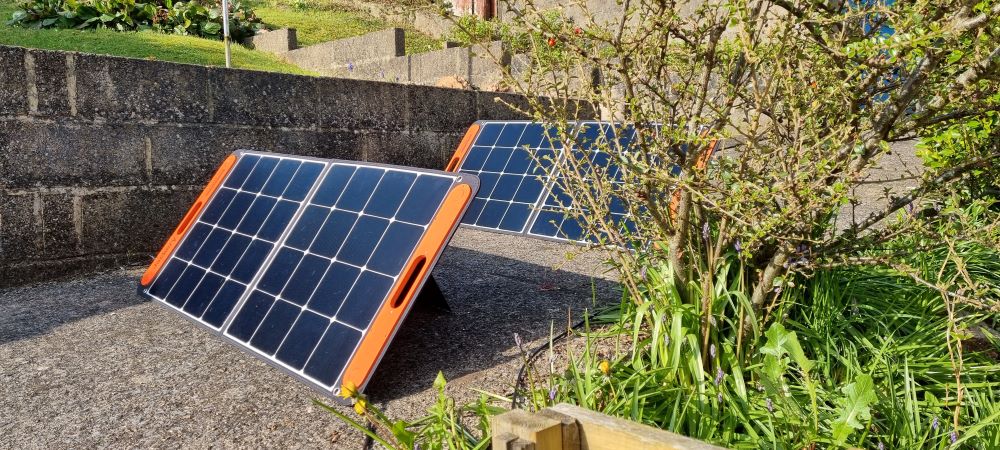
These are the panels you often see in Instagram ads. They fold up like a big briefcase with a handle, and you set them up on the ground with kickstands.
The Advantage:
- You can always get the best angle. Park your campervan in the shade, run a cable out, and set your panels in the sun.
- There’s no need to drill holes in your roof.
- When you’re done, just slide them under your bed.
The Disadvantage:
- If you leave your campsite for a hike, a £300 folding panel left on the grass could get stolen.
Best For: Weekend campers, tent users, and anyone who uses their van as a daily driver and doesn’t want permanent roof panels.
2. Rigid (Glass) Solar Panels
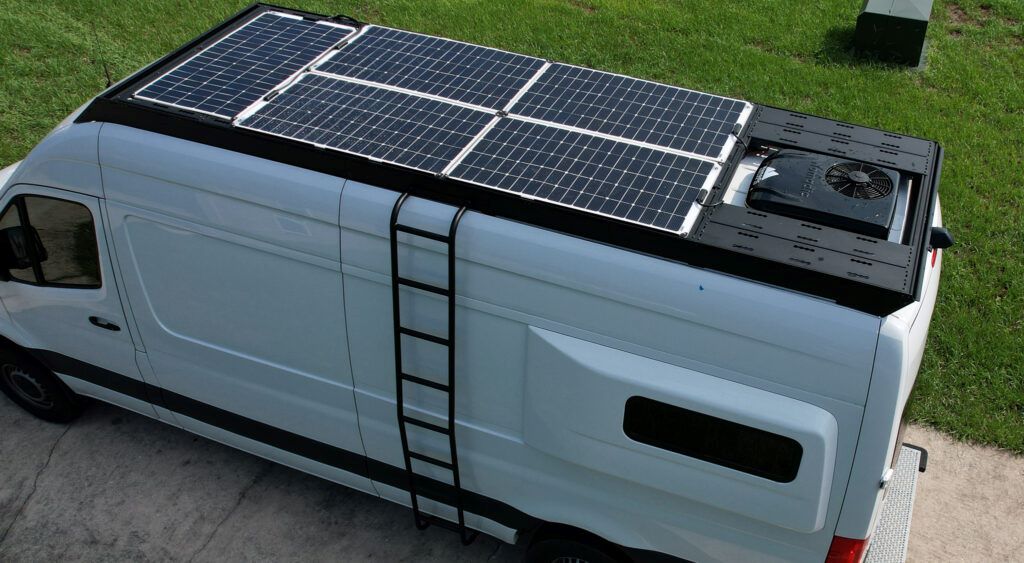
These are the classic, sturdy panels you see on house roofs. They use efficient solar cells protected by thick tempered glass and a strong aluminium frame.
The Advantage:
- They’re extremely durable and can handle decades of hail and low tree branches.
- They’re the cheapest per Watt, so you get the best value.
The Disadvantage:
- You’ll need to drill holes in your van’s roof to mount them.
- They’re fairly heavy (usually 8-12kg each), which can add some aerodynamic drag.
Best For: Full-time van lifers, motorhome owners, and serious off-grid setups where durability is the number-one priority.
3. Flexible (Thin-Film) Solar Panels
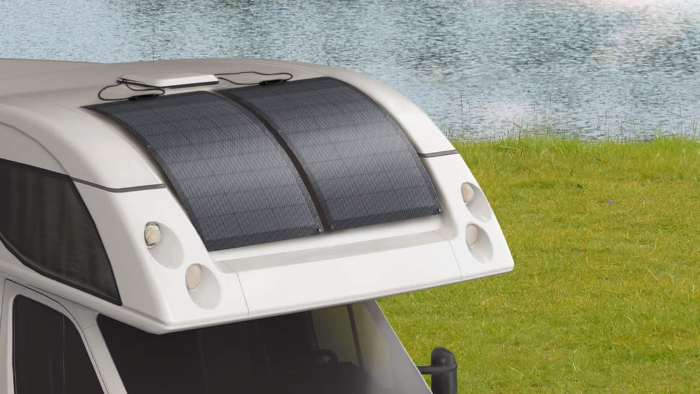
Flexible panels are very thin (less than 3mm) and made of plastic instead of glass. They can bend up to 30 degrees to fit your vehicle’s roof.
The Advantage:
- They’re very lightweight and don’t cause any aerodynamic drag.
- Since they’re glued flat to the roof, they’re “stealthy” and can’t be seen from the ground.
The Disadvantage:
- Because they’re glued straight to hot metal with no airflow underneath, they can suffer from “Heat Degradation.”
- They don’t last as long as rigid glass panels—usually 5-7 years, compared to 20 or more.
Best For: Fibreglass pop-top roofs, teardrop trailers, and “stealth” campervans.
The Reality Check: UK Weather and “Over-Panelling”
If you’re travelling in sunny Spain, a 200W solar panel will usually give you the full 200W.
If you’re in the UK, especially from October to March, it’s different. On cloudy winter days, the sun is low, and your flat-roof panels might produce only 10% to 25% of their maximum power.
The Rule of Thumb:
If your Power Audit says you need 500Wh per day, don’t just get a single 100W solar panel. To recharge reliably in 4-5 hours of sunlight, especially on cloudy UK winter days, add at least 50% more capacity. Choose a 150W or 200W panel, or use a few smaller ones.
The “MC4 Secret” (How to Save Money)
There’s a common myth in the off-grid world: if you buy an EcoFlow power station, you have to buy their expensive solar panels too.
That’s not true.
Almost all modern rigid and flexible solar panels use the same universal plug, called an MC4 Connector.
If you buy a portable power station, you can use a simple adapter cable (like an MC4-to-XT60) to connect it to almost any third-party solar panel.
This means you can get a high-quality Bluetti or EcoFlow unit for your van and save hundreds by installing standard, affordable rigid roof panels from Amazon.
Important: Just make sure you stay within your power station’s maximum voltage limit. Always check the manual, and everything will work together.
Chapter 4: The Build (Wiring, Fuses & Keeping It Safe)

Now that your power station and solar panels are ready, it’s time to build your van’s electrical system and turn on the lights.
Many beginners worry about making mistakes with wiring at this stage. The good news is that with a modern power station and hub, such as the Bluetti Charger 2, most of the high-risk, high-voltage wiring is already built in and safely contained.
You’ll still need to run 12V cables from the fuse box to your campervan’s appliances, like LED ceiling lights, a water pump, a roof fan, and a compressor fridge. Here’s how to do this safely and neatly.
1. Understanding 12V vs 230V
Your campervan has two completely separate electrical systems:
230V AC (Household Power)
This is the same power you use at home. It’s designed for higher-power appliances such as laptop chargers, travel kettles, hair dryers, and small microwaves.
You do not need to wire any of these! Simply plug them directly into the standard 3-pin UK plug sockets on the front of your EcoFlow or Bluetti power station, exactly as you do at home.
12V DC (Battery Power)
This is the system that powers your built-in campervan appliances: LED lights, water pump, compressor fridge, USB sockets, fans, etc.
This is the part you’ll wire yourself or extend from the power station’s DC Power Hub. It’s much safer and easier than 230V wiring, but you still need to use the correct cables, fuses, and connections.
2. The “Garden Hose” Rule (Wire Sizing)
A common mistake is using wires that are too thin. Imagine electricity as water flowing through a garden hose.
If you push a lot of water (high current) through a narrow hose (thin wire), it meets resistance and heats up. In an electrical system, this heat can melt insulation or even cause a fire.
Always use cables that are thick enough for the amount of current they need to carry.
High-power appliances (compressor fridge, diesel heater, water pump, large fans):
- Use a thicker cable, usually 6mm to 10mm (about 10 to 6 AWG).
Low-power items (LED lights, USB sockets, small fans):
- You can safely use a thinner cable, such as 1.5mm or 2.5mm (about 16 to 14 AWG).
Pro Tip: If you’re unsure, choose a thicker wire. Using a slightly larger wire is safer, carries current better, and helps keep your lights bright and your fridge running smoothly.
3. Fusing 101 (The Golden Rule)
If you remember only one thing from this guide, make it this:
Fuses protect the wire, not the appliance.
If a wire gets pinched behind a cabinet, rubbed by vibration, or chafes against the van’s metal frame, it can cause a short circuit. This can create a large current surge that might melt the wire and start a fire.
A fuse acts as a built-in weak link in the circuit. If too much current flows, the thin metal strip inside melts and breaks the circuit before the wire overheats or gets damaged.
Key takeaway: Always choose a fuse that matches or is just below the wire’s maximum safe current, not the appliance’s. This protects your wiring and helps prevent fires.
Simple 12V Wiring Diagram
This diagram shows how to connect your power station to your appliances using a fuse box.
┌─────────────────────────────────────┐
│ POWER STATION │
│ (EcoFlow/Bluetti Power Hub) │
│ │
│ DC Output Port │
│ (Anderson/XT60 Connector) │
└──────────────┬──────────────────────┘
│
(Thick Red & Black Cable)
(6-10mm / 10-6 AWG)
│
▼
┌──────────────────────┐
│ 12V FUSE BOX │
│ (Main Distribution) │
│ │
│ Positive │ Negative │
│ Rail │ Rail │
└─┬─────────────┬─────┘
│ │
┌─────┼──────────┬──┼─────────┬──────┐
│ │ │ │ │ │
▼ ▼ ▼ ▼ ▼ ▼
LED 12V Water Diesel Roof
Lights Fridge Pump Heater Vent Fan
15W 50W 20W 25W 15W
2.5mm 6-8mm 4-6mm 4-6mm 2.5mm
Wire Wire Wire Wire Wire
20A 40A 30A 30A 15A
Fuse Fuse Fuse Fuse Fuse
Key Wiring Rules
USE RED FOR POSITIVE (+) AND BLACK FOR NEGATIVE (-)
ALWAYS FUSE WITHIN 50CM OF THE POWER SOURCE
- This step protects the main cable coming from the power station.
WIRE GAUGE MUST MATCH THE CURRENT LOAD
- High Power (Heater, Fridge): 6-10mm cable, 30-50A fuse
- Medium Power (Pump, Lights): 4-6mm cable, 20-30A fuse
- Low Power (Fan): 1.5-2.5mm cable, 10-20A fuse
USE HEAT SHRINK TUBING on all connections
ROUTE CABLES AWAY FROM
- Sharp edges
- Hot surfaces
- Moisture/wet areas
LABEL EVERY FUSE clearly with appliance name and amperage
INSTALL A MASTER DISCONNECT SWITCH between the power station and the fuse box
4. Connecting Your Power Hub & Installing the 12V System
In the past, connecting your fuse box to the battery meant dealing with exposed metal battery terminals, which could be dangerous.
Now, it’s a simple plug-and-play connection. Most modern power stations, like the EcoFlow DELTA or Bluetti AC series, have a dedicated high-current DC output port, usually an XT60 or Anderson connector.
How the Bluetti Charger 2 System Works
Here’s an overview of how everything connects with the Bluetti Charger 2 and the Charger 2 DC Hub. This setup is one of the easiest ways to power and connect your 12V appliances in early 2026.

The Bluetti Charger 2 can deliver up to 1200W of charging power to the power station’s battery by using both solar panels and the vehicle’s alternator. This means you can fully recharge your power station in just a few hours of driving.
Power from the Charger 2 goes to the power station for battery storage and also feeds the Charger 2 DC Hub to directly power the van’s 12V system at the same time.
Together, the Charger 2 and DC Hub can be paired with the following power stations:
- Bluetti Apex 300 (2,764.8Wh capacity)
- Bluetti AC200MAX (2,048Wh capacity)
- Bluetti AC200L (2,048Wh capacity)
If you plan to buy this system, the Bluetti Official store offers discounted pre-packaged bundles so everything works right out of the box.
Installation Steps: Connecting the DC Hub to Your Fuse Box

Step 1: Mount Your Fuse Box
Mount a standard 12V blade fuse box in a spot on your campervan wall that’s easy to reach and not hidden behind appliances.
Step 2: Run Wires From Your Appliances
Run positive (red) and negative (black) wires from your LED lights, fridge, water pump, and other 12V appliances to the fuse box. Leave a little extra length for easy connection.
Step 3: Connect the Bluetti DC Power Hub to the Fuse Box
- Plug the Anderson connector into the DC output port on the top of the Bluetti DC Power Hub.
- Run the positive (red) and negative (black) wires from the Anderson connector to the corresponding positive and negative busbar terminals in your fusebox.
- Use the right cable size for the expected load. For most van setups, 6-10mm (10-6 AWG) is usually enough.
Note: Bluetti doesn’t include this specific cable. You can find pre-made Anderson-to-busbar cables on Amazon. Measure the distance between the DC Power Hub and your fuse box before ordering the right length.
Step 4: Install Fuses and Connect Appliances
For each appliance:
- Install the fuse first in the fuse box. Choose the correct rating based on the cable size and the appliance’s load.
- Connect the positive and negative wires from the fuse box to the appliance terminals.
- Label the fuse clearly with the appliance name and amperage, for example, “Fridge 40A.”
Step 5: Connect the Charger 2 to the DC Hub
Connect the Bluetti Hardwired 1.5-metre Connection Cable from the Bluetti Charger 2 to the DC Power Hub. This lets the Charger 2 send power to the DC Hub and charge the power station at the same time.
Step 6: Test Before Powering On
Use a voltmeter to check all connections before turning on the system. You should see about 12V between the positive and negative wires at each appliance.
Start Up!
Once everything is connected, turn on the station and your whole van will light up!
It really is that simple. With a modern power station, the Charger 2, and a DC Hub, you no longer need complicated busbars, risky inverters, or messy split-charge relays.
The Big Benefits
This 12V system offers some great benefits:
- You’re no longer limited to a 10 Amp car socket when using your power station.
- You now have a full 50 Amp capacity, so your diesel heater won’t trip anymore.
- You don’t have to run only one item at a time anymore.
- Now you can easily power several 12V devices at once, like a fridge, lights, roof fans, a diesel heater, a TV, and more, without worrying about running out of power.
Chapter 5: Top Appliance Recommendations (What Actually Works Off-Grid)
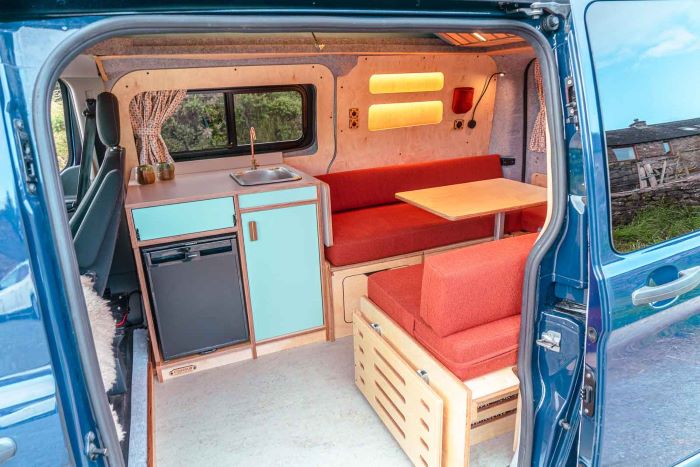
Now that you have a big battery and safe wiring, it’s time to add appliances to your van.
Many people buy regular household appliances for their campervan, but that can cause problems. For example, plugging a standard 3,000W UK kitchen kettle into a portable power station will overload it and shut it off immediately.
To live comfortably off-grid, you’ll need appliances designed for low power use. Here’s our expert list of the best off-grid gear.
The 12V Essentials (Run These on Battery Power)
These items plug directly into the DC ports on your power station or connect to your 12V fuse box. They don’t need the AC inverter, so they’re very efficient.
1. The 12V Compressor Fridge
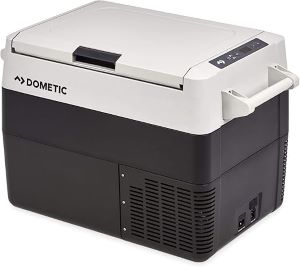
Avoid cheap thermoelectric coolboxes—they drain your battery fast and can’t keep food cold in summer. Instead, get a 12V compressor fridge like the Alpicool 44L NL50 or the Dometic CFF 45. These work like your fridge at home but use very little power (about 40W to 50W) and turn on and off automatically to save energy.
The Alpicool NL50 is a highly economical single-zone compressor fridge/freezer. It targets casual campers, road-trippers, and weekend warriors who want efficient refrigeration without paying premium-brand prices.
The Dometic CFF 45 is a mid-tier offering from an industry leader, serving as a reliable crossover choice between entry-level coolers and their top-tier, ultra-premium CFX3 series.
2. The Diesel Heater
Electric space heaters use a lot of power, about 2000W, and will drain your battery in about an hour.
A better option is a 12V diesel heater.
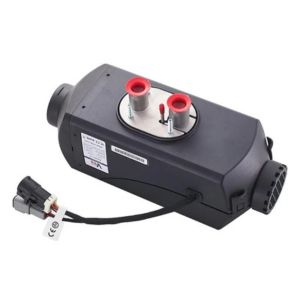
They can connect to your vehicle’s fuel tank or use their own, producing plenty of heat while using just a small amount of 12V power (about 10W to 40W) for the fan. They can keep your van at 20°C for days, even in a British winter.
The VEVOR 2kW Diesel Air Heater is widely considered one of the best budget-friendly heating solutions in the UK for smaller campervans, caravans, boats, and workshops. It is highly praised for preventing overheating in compact spaces, though it requires regular maintenance to prevent soot buildup.
3. Starlink Mini (Off-Grid Wi-Fi)
If you work remotely, the Starlink Mini is a real game-changer. Unlike older dishes that require 230V power, the Mini runs directly on 12V DC and draws only about 30W. It gives you fast internet even in the most remote parts of the Scottish Highlands.

The 230V Comforts (Run These on Your AC Sockets)
These items plug into the regular 3-pin sockets on the front of your EcoFlow or Bluetti.
4. The Low-Wattage Travel Kettle
We know a cup of tea is a must on any UK road trip. Since a regular kettle will overload your system, you’ll need a travel kettle rated between 600W and 1,000W. It takes about a minute longer to boil, but you can use it with a mid-sized 1000Wh power station without worry.
The Quest 35440 Compact Travel kettle (0.5 Litres) is a highly portable, budget-friendly electric kettle specifically optimised for travel, camping, and caravan use.

5. Portable Induction Hob
Gas stoves can cause significant condensation inside your van. If you have a large power station (2000Wh or more), you can cook safely and cleanly with a portable induction hob. Choose a single-ring hob that lets you set the wattage to 1000W or 1200W, so you won’t overload your inverter while making breakfast.
The Outdoor Revolution Single Induction Cooker is a highly versatile portable electric hob designed for mobile camping. It balances rapid heating with advanced safety features.

Estimated Cost Breakdown
Here’s a realistic budget for building your off-grid power system. Prices are approximate UK retail (2026):
Budget Build (Weekend Camper)
| Component | Item | Cost |
| Power Station | EcoFlow DELTA 2 (1024Wh) | £700-800 |
| Solar Panels | 2x 100W Rigid Panels | £200-250 |
| Alternator Charger | EcoFlow 800W | £300-350 |
| Wiring & Installation | Cable, fuse box, connectors | £100-150 |
| 12V Fridge | Alpicool 44L NL50 | £300-400 |
| TOTAL | £1,600-1,950 |
Mid-Range Build (Full-Time Van)

| Component | Item | Cost |
| Power Hub | Bluetti DC Power Hub | £400-500 |
| Battery | Bluetti AC200MAX (2048Wh) | £1,500-1,800 |
| Solar Panels | 2x 200W Rigid Panels | £400-500 |
| Alternator Charger | Bluetti Charger 2 | £600-700 |
| Wiring & Installation | Cable, fuse box, busbar | £200-300 |
| 12V Fridge | Dometic CFF 45 | £800-1,000 |
| Diesel Heater | VEVOR 2kW | £300-400 |
| TOTAL | £4,600-5,800 |
Premium Build (Off-Grid Home)

| Component | Item | Cost |
| Power Hub | Bluetti DC Power Hub | £400-500 |
| Battery | Bluetti Apex 300 (2764Wh) | £2,500-3,000 |
| Solar Panels | 3x 300W Rigid Panels | £800-1,000 |
| Alternator Charger | Bluetti Charger 2 | £600-700 |
| Wiring & Installation | Full installation service | £500-1,000 |
| 12V Fridge | Dometic CFX3 Premium | £1,200-1,500 |
| Diesel Heater | Quality import (5kW) | £400-600 |
| Backup Generator | 5kW Portable | £400-600 |
| TOTAL | £7,200-9,500 |
Key Tips:
- You can save 30-40% by sourcing generic 12V components instead of branded units.
- Solar panels from Amazon are often 50% cheaper than brand-specific options (use the MC4 adapter trick!)
- Professional installation adds £300-1,000+ but saves time and ensures safety.
- Budget an extra £200-500 for unexpected wiring, connectors, and testing equipment.
- Flexible panels cost less upfront but degrade faster. Choose rigid panels for long-term builds.
- Consider buying used EcoFlow units from eBay (save 20-30%) if buying new is out of budget.
Quick Start Checklist
Before You Buy:
- ☐ Complete your Power Audit (Chapter 1)
- ☐ Calculate your Magic Number (Wh needed)
- ☐ Choose Route A (portable) or Route B (hub) for your van type
- ☐ Set a budget (check cost breakdown)
- ☐ Research brands (EcoFlow, Bluetti, Jackery reviews)
Shopping List (Budget Build):
- ☐ Power station (1000-2000Wh)
- ☐ Alternator charger
- ☐ 2x solar panels (100-200W each)
- ☐ 12V blade fuse box (standard automotive)
- ☐ Fuses (20A, 30A, 40A, 50A mix)
- ☐ 12V cable (6mm & 10mm red/black)
- ☐ Anderson connectors or XT60 plugs
- ☐ Crimping tool & wire strippers
- ☐ Basic voltmeter
- ☐ Heat shrink tubing & electrical tape
- ☐ 12V fridge
- ☐ 12V/230V appliances of choice
Installation Order:
- Mount the power station in an accessible location (under the seat/boot)
- Install alternator charger (if not built-in)
- Mount the fuse box on the wall, accessible.
- Run 12V cables from the power station to the fuse box (fuse within 50cm)
- Run individual circuits from the fuse box to appliances.
- Mount solar panels on the roof (or use a portable stand)
- Connect solar panels to the power station.
- Test each circuit individually before using them simultaneously.
- Label all fuses clearly.
- Test alternator charging on a 2-hour drive
Safety Checklist:
- ☐ All cables properly fused (within 50cm of power source)
- ☐ Wire gauge matches current load (no thin wires on high-power circuits)
- ☐ No exposed terminals or bare wires
- ☐ Heat shrink tubing on all connections
- ☐ Voltmeter readings show 12V at every appliance
- ☐ Power station has ventilation (not enclosed)
- ☐ Backup fuses stored in fuse box (extra 20A, 30A, 50A)
- ☐ No burning smells or overheating
- ☐ Familiarised with emergency shutdown
- ☐ Smoke detector installed in van (critical!)
Monthly Maintenance:
- ☐ Clean solar panels (wipe with a soft cloth)
- ☐ Check for corrosion on battery terminals
- ☐ Test one 12V circuit each month
- ☐ Verify alternator is charging (voltmeter check)
- ☐ Listen for unusual noises (buzzing = loose connection)
Troubleshooting FAQ
Power System Issues
Q: My power station shows “Low Power”, but my battery isn’t empty. Why?
A: This is usually the inverter cutting out. Modern power stations reduce output when demand exceeds their capacity (usually 2000W max). Solution: Reduce load by unplugging high-wattage items like kettles or heaters. Check your power audit – you may have underestimated daily consumption.
Q: My fridge keeps turning off during the night.
A: Your power station is running out of energy before morning. This means either:
- Your power audit was wrong (recalculate with fridge running 24/7, not 8 hours)
- You need a larger capacity power station (upgrade from 1000Wh to 2000Wh)
- Your alternator charger isn’t topping up the battery properly while driving.
Drive for at least 2 hours daily to recharge adequately, or add more solar capacity.
Q: The power station won’t charge from my van’s alternator.
A: Check these in order:
- Is the alternator charger cable actually plugged in? (Sounds silly, but it happens!)
- Is your van engine running? (It won’t charge while parked)
- Is the battery terminal corroded? Clean the connection with a wire brush.
- Test with a voltmeter – alternator should output 13.5V+
- If the voltage is low, your alternator may be faulty (get it tested at a garage)
Q: My lights are dimming when I use the heater.
A: Voltage drop! Your wiring is too thin for the combined load. Solution:
- Upgrade your heater cable from 4mm to 6mm or 8mm.
- Install the heater fuse closer to the power station (reduce cable distance)
- Reduce the heater temperature setting temporarily.
- This is a fire risk – fix it immediately.
Q: The power station gets really hot and throttles back power.
A: This is normal in warm weather. Power stations limit output when temperatures exceed 35-40°C. Solutions:
- Ensure airflow around the station (don’t enclose it in a cupboard)
- Place it in a shaded area of the van.
- In extreme heat, run power-heavy appliances early morning/evening.
- If it’s constantly overheating, your unit may be faulty – contact the manufacturer.
Solar Panel Issues
Q: Why am I only getting 100W from a 200W solar panel on a sunny day?
A: Likely causes:
- Panel angle – Flat-mounted roof panels only catch 60-70% of winter sun. Portable panels on stands get 90%+
- Dirt/dust – Clean your panels monthly. Dust can reduce output by 20%
- Temperature – Solar panels work better in cold weather. Hot summer days = less efficiency
- Cable distance – Long cables cause a voltage drop. Keep cables under 10 metres.
- Shade – Even partial shade from trees/buildings cuts output by 50%+
Q: My flexible panels are producing less power than last year.
A: Flexible panels degrade due to heat. They’re rated for a 5-7 year lifespan vs 20+ for rigid glass panels. If you installed them 3+ years ago, consider upgrading to rigid panels for your next build.
Q: Can I use my car’s solar panel charger for my power station?
A: No! Car solar chargers are 5-20W trickle chargers. Your power station needs proper solar panels (100W+) with an MPPT charge controller built in. Car chargers will take months to recharge a 2000Wh station.
Wiring & Fuse Issues
Q: I smell burning near my fuse box. What do I do?
A: Turn off the power station immediately and disconnect the battery. This is a fire risk. Likely causes:
- Loose connection burning at the terminal (corrosion)
- Wrong fuse size (too high), allowing overheating
- The wire gauge is too thin for the load.
Don’t use it again until it’s professionally inspected.
Q: My 50A fuse keeps blowing.
A: Your system is drawing more than 50A. Possible causes:
- Heater + fridge + lights running simultaneously (over-current)
- A short circuit in one of your appliance cables
- Incorrect fuse rating (should match your wire gauge, not your appliance)
Test each appliance individually to find the culprit. If all is fine when used alone, you’re simply exceeding 50A capacity – this is expected if running everything at once.
Q: One of my lights won’t turn on, but others work fine.
A: Likely causes:
- Burnt-out LED bulb (replace it)
- Loose connection at the light socket or fuse box (tighten terminals)
- Bad fuse in that circuit (test by swapping with another fuse temporarily)
- Corroded wire connection (cut off corroded section, strip, and re-crimp)
Use a voltmeter to test – you should have 12V at the positive terminal of the broken light.
Appliance Problems
Q: My travel kettle is way too slow. Can I use a regular 3000W kettle instead?
A: No. A 3000W kettle will instantly shut off your power station (they max out at 2000W AC output). Stick with 600-1000W travel kettles. They take 2-3 minutes instead of 1, which is a fair trade-off.
Q: My diesel heater makes a terrible noise/smell when first starting.
A: Normal! Diesel heaters are loud on startup (loud fan) and produce a diesel smell. After 10 seconds, the noise should drop significantly. If it persists or smells like burning plastic:
- Clean the fuel filter.
- Drain old fuel and refill with fresh diesel.
- Check for soot buildup (requires professional service)
Q: Can I use a 230V microwave off my power station?
A: Only with a large power station (2000Wh+) and a high-power unit rated 800W or less. Standard microwaves are 900-1200W and will overload you. Better option: Use a small 500W portable microwave made for caravans, or cook on your induction hob instead.
Buying & Planning
Q: Should I buy a power station now or wait for cheaper models?
A: If you need it within 6 months, buy now. Prices in this category are stable. EcoFlow and Bluetti release new models annually, but older models drop by 10-15%, and new features usually justify the cost.
Q: Can I return a power station if my van build fails?
A: Yes, within 30 days from major retailers (Amazon, official stores). But once installed/used, you lose the box and warranty. Test everything in your driveway for a week before fully committing.
Q: What if I buy too small a power station?
A: You can always add a second unit. Many people run two 1000Wh stations in parallel (doubled capacity, doubled redundancy). Some systems support external battery add-ons (e.g., Bluetti B300S modules).
Conclusion: Your Off-Grid Journey Starts Here
You now know more about off-grid electrical systems than most first-time van builders do.
You’ve learned how to check your power needs, that modern Smart Hubs and Portable Power Stations have replaced complicated Victron boards, and how to safely wire your lights and fridge.
Your Next Step:
Head over to our Brand Battle: EcoFlow vs Bluetti vs Jackery to pick out the perfect power station for your new build, and get ready to hit the road!
Enjoy your off-grid travels! 🚐⚡

