The Best 12V Campervan Electrical System for Off-Grid (Bluetti Apex 300)
By: Jonny Graham | Updated June 2026 11 min read time
Building a campervan is an amazing journey, but let’s be honest: designing the electrical system is the part that keeps most of us awake at night. Between calculating wire gauges, crimping lugs, and staring blankly at a complex campervan 12V system wiring diagram, it is easily the most overwhelming part of a build.
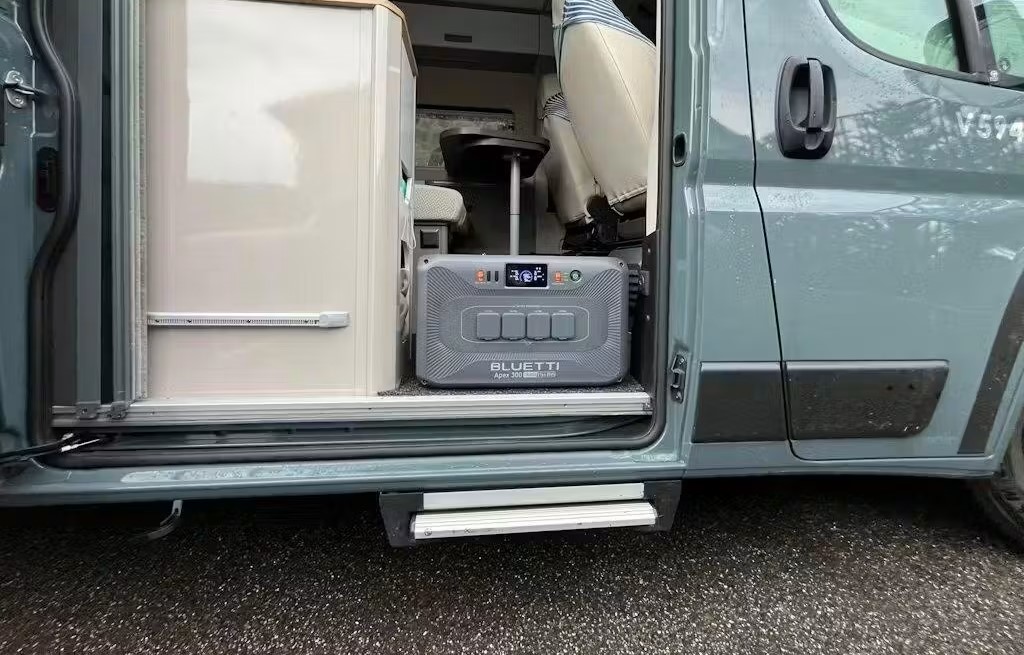
Fortunately, the era of DIY fuse boxes and messy cable runs is over. If you are looking for the best 12V campervan electrical system for off-grid travel, the Bluetti Apex 300 paired with the DC Power Hub and Charger 2 is the ultimate plug-and-play solution.

Skip the Headache: Why You Don’t Need a Complex Campervan 12V System Wiring Diagram.
If you have spent any time scrolling through van conversion forums or watching build videos, you have probably seen them: massive, spaghetti-like campervan 12V system wiring diagrams that look like they require an electrical engineering degree to decode.
Traditionally, building a reliable off-grid electrical system meant sourcing and connecting a dozen individual components:
- Heavy AGM or lithium leisure batteries
- A bulky pure sine wave inverter
- An MPPT solar charge controller
- A smart split charge relay or DC-DC charger
- Bus bars, shunts, and a dizzying array of inline fuses
Not only does this traditional method take up a massive amount of valuable space inside your van, but a single incorrectly crimped wire or blown fuse in the middle of the Lake District or the Highlands can bring your entire trip to a dark, freezing halt.
This is exactly why the industry is rapidly shifting toward premium all-in-one ecosystems. By centring your build around a unit like the Bluetti Apex 300, the inverter, solar controller, and battery management system (BMS) are all safely housed in a single, solid, factory-tested casing. You are completely bypassing the most stressful part of the van build. No complex wiring diagrams, no guessing wire gauges, and absolutely no electrical anxiety.
Building Your Off-Grid Solar Power System Full Kit
When you invest in a premium setup for your rig, you aren’t just buying a battery; you are investing in an off-grid solar power system full kit that guarantees your lights stay on, your food stays cold, and your gear stays charged. The Bluetti ecosystem achieves this by splitting the workload across three perfectly integrated units: the heavy-lifting power station the Apex 300, the intelligent Bluetti Charger 2, and the 12V distribution DC Hub.
The Powerhouse: Bluetti Apex 300 Overview
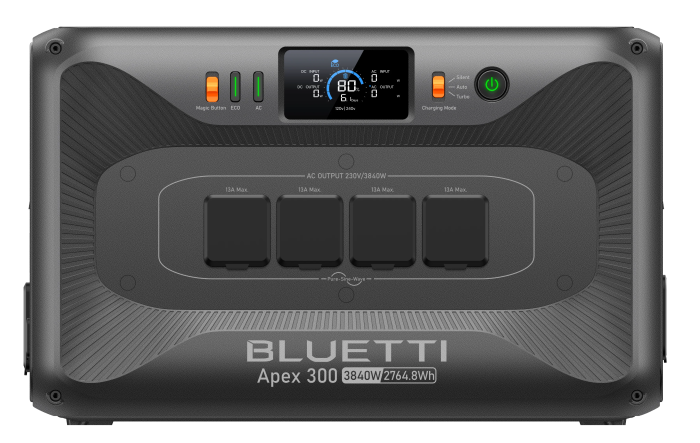
Bluetti Apex 300 Features Table (UK Market)
| Features | Specifications |
|---|---|
| Battery Chemistry | LiFePO₄ (LFP) |
| Battery Capacity | 2,764.8 Wh (Expandable to 58 kWh) |
| Cycle Life | 6,000+ cycles (to 80% capacity) |
| AC Charging Time | ~75 minutes (0-100% via Turbo AC charging; 80% in ~45-55 mins) |
| Solar Input Max | 2,400W (2 × 1,200W ports)”Not sure how many solar panels you need to max out this input? Use our Free Solar Panel Calculator to find the perfect array.” |
| AC Outlets | 6 x 230V UK outlets |
| USB Ports | Via optional Hub D1: 2 × USB-A, 2 × USB-C (100W each) + additional DC ports |
| Expandability | Up to 3 units in parallel + multiple B300K expansion batteries (up to 58 kWh total) |
| App Control | Yes (via Bluetti app over Wi-Fi and Bluetooth) |
| Weight | 38 kg (83.78 lbs) |
| Warranty | 5 Years |
| Price | From ~£1,699 (check Bluetti UK) |
Whether you need to run an induction hob for your morning coffee, power up a diesel heater on a cold evening, or keep your laptops and drone batteries fully charged, the Apex 300 delivers pure, uninterrupted power. It completely removes the need for a bulky, standalone inverter, giving you multiple standard 3-pin UK household sockets right inside your van.
Bluetti Apex 300 UK Runtime Estimates for Various Van Items
| Appliance | Typical Power (W) | Estimated Runtime |
|---|---|---|
| Diesel Heater | 10-50W (average running; higher on startup) | 150-200+ hours |
| Air Fan Ceiling (12V) | 5-40W (depending on speed) | 50-400+ hours |
| 50W Fridge | 50W (average running) | 40-45+ hours |
| Single Hob (Induction) | 1,000-1,500W (typical use) | 1.5-2.5 hours |
| Standard Kettle | 2,200-3,000W | 5-8 boils (or ~45-60 mins total use) |
| Flat Screen TV | 30-80W | 25-70+ hours |
| Mini Starlink | 25-40W | 50-80+ hours |
| Laptop | 50-100W | 20-40+ hours or 25-50 charges |
| iPhone Charger | 10-20W | 100-200+ hours |
| Lighting (LED, multiple) | 20-100W total | 20-100+ hours |
| CPAP Machine | 30-60W | 35-60+ hours |
| Small Microwave | 600-1,000W | 2-3.5 hours |
You can learn more about the Bluetti Apex 300 from the Bluetti Website.
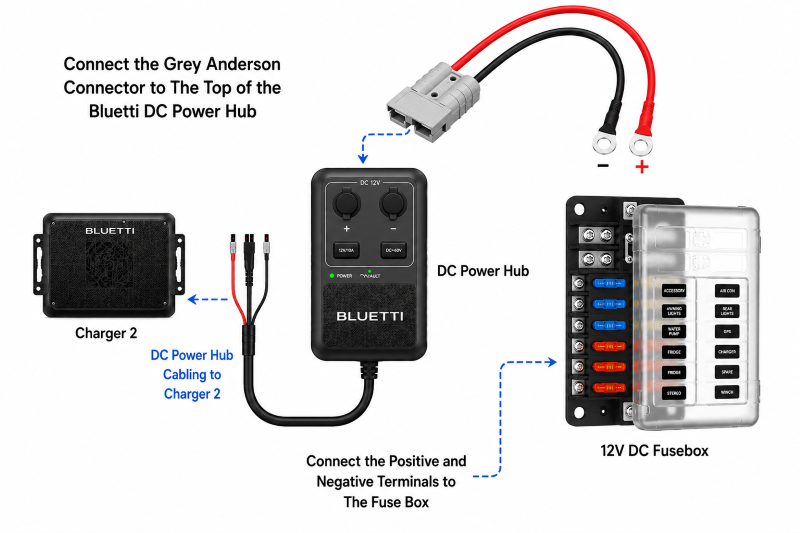
The Brains: Simplifying Connections with the DC Power Hub
While the Apex 300 handles the heavy lifting, the Bluetti DC Power Hub acts as the central nervous system for your build. This is where the magic genuinely happens for the DIY converter.
Instead of wiring an external fuse box and running chaotic positive and negative cables across your van’s walls, the DC Power Hub centralises all 12V connections into one clean, stylish interface. You can effortlessly plug in and run your essentials directly from the hub, including your:
- 12V campervan fridge
- LED interior lighting circuits
- 12V water pump system
- 12V CCTV system for campervan security
- 12V Diesel Heater
It acts as a secure, monitored distribution block that connects seamlessly back to the Apex 300, guaranteeing your essential 12V appliances draw power properly without ever risking an overload or a blown fuse.
Free Download: 12V Campervan Wiring Guide & Diagram
While the Bluetti ecosystem handles the complex power routing, you still need to safely run cables from your lights, fridge, and water pump directly to the hub. Grab our free 12V Campervan Wiring Guide & Diagram to see exactly how to size and route your accessory cables perfectly!
You can learn more about the DC Power Hub at the Bluetti Website.
What are the best alternator charging systems for campervans in the UK?
For UK van-lifers, relying purely on solar panels is a massive gamble. Between overcast skies in autumn and the short daylight hours in winter, you need a backup plan. That is why the ability to charge your battery directly from your vehicle’s engine is absolutely non-negotiable.
How to charge a leisure battery from an alternator?
In the past, figuring out how to charge a leisure battery from an alternator meant wrestling with voltage-sensitive relays (VSRs) or bulky third-party DC-DC chargers. You had to calculate voltage drops, route thick cables from your vehicle’s starter battery, and hope the relay engaged correctly without frying your electronics.
The Bluetti Charger 2 completely rewrites this process. It is a smart, ultra-efficient alternator-charging kit that connects your van’s engine directly to the Apex 300. Because it is built within the same ecosystem, it communicates flawlessly with the Apex 300’s battery management system (BMS). It automatically detects when your engine is running and safely pulls up to 800W of optimal power without ever risking a drained starter battery. The Charger 2 also seamlessly handles up to 600W of solar power, handling a combined charging power of 1200W.
Bluetti provides excellent money-saving discounts when you purchase the complete system bundle of the Apex 300, Charger 2, and the Hub D1 together.
The Pros Of This System For Campervans:
- Rapid Alternator Recharging (No Idling Required): In a campervan, driving is your primary power source. The Charger 2 connects directly to your van’s starter battery/alternator and pulls up to 800W while driving. This means just 2.5 to 3 hours of highway driving will completely top up your dead battery.
- Native 50A Heavy-Duty DC Output: Standard power stations typically offer only a weak 10A cigarette lighter port, which cannot power common van appliances. The Hub D1 lets you directly wire your van’s 12V fuse block. This provides more than enough current to run diesel heaters, 12V compressor fridges, water pumps, and roof maxxfans simultaneously.
- Alternator + Solar Dual Input: The Charger 2 handles both solar and alternator charging through a single connection. When parked, it prioritises your roof solar panels; when driving, it seamlessly blends alternator power to maximise incoming energy.
- Starter Battery Rescue: If you accidentally leave your van’s headlights or radio on overnight and drain your starter battery, the Charger 2 features reverse bidirectional charging. You can use the touchscreen or app to pump power back from the Apex 300 into your vehicle’s engine bay to jump-start yourself in remote locations.
- Low Idle Draw for Constant Loads: Campervan fridges run 24/7. The Apex 300’s ultra-low 20W inverter idle consumption means you won’t experience massive “phantom drains” overnight, keeping your food cold without wasting precious amp-hours.
The Cons Of This System For Campervans:
- Awkward Spatial Footprint & “Cable Nest”: Unlike a custom-built component system that lays flat under a bench, this setup requires mounting three distinct blocks. You have to mount the heavy Apex 300 main unit (38 kg), screw the Charger 2 to a wall, and mount the Hub D1 nearby. The heavy, proprietary interconnecting cables can take up a lot of valuable garage or bench space and look cluttered if not carefully hidden.
- Strict 60V Solar Roof Ceiling: If you want to put solar panels on your van roof, you are limited by the Charger 2 / Apex 300’s built-in 60V solar threshold. You cannot wire large 400W residential roof panels in series. You must wire them in parallel, which requires routing thick, stiff 10AWG or 8AWG solar wires through your roof gland to handle the high amperage.
- Zero System Ventilation Flexibility: Because the main Apex 300 unit houses a massive 3,840W inverter, it pulls a high volume of air through its internal cooling fans under heavy loads (like running a microwave or induction cooktop). You cannot seal this system inside a tight, unventilated wooden bench or cabinet without risking thermal shutdown.
- Weight and Fixed Nature: At roughly 40+ kg (88+ lbs) for the entire bundle, this is not a power station you easily pull out of the van to use at a picnic table. It is essentially a fixed vehicle installation.
Final Verdict: Is the Complete Bluetti Ecosystem Worth It?

When you total up the cost of individual components—a high-end lithium battery, a pure sine wave inverter, an MPPT solar controller, a smart split charge relay, a fuse box, and all the heavy-gauge copper cabling required to link them—the traditional DIY route is not only incredibly stressful, but surprisingly expensive.
By investing in the Bluetti Apex 300, the DC Power Hub, and the Charger 2, you are buying a complete, guaranteed solution. You are eliminating complex wiring diagrams and ensuring your off-grid power is as reliable as the vehicle you drive.
For anyone tackling a campervan conversion, this setup is the ultimate definition of plug and play.
Questions & Answers
1. What Makes the Bluetti Apex 300, Charger 2, and DC Hub the Ultimate Plug-and-Play Solution?
The Bluetti Apex 300 ecosystem eliminates the need for complex, custom wiring in your campervan or RV. When paired, the system automatically links your vehicle’s alternator, solar panels, and essential DC devices without requiring voltage converters. You get up to 1,200W of dual-charging from your engine and solar while driving, ensuring continuous, reliable power from the moment you plug in.
2. Can the Bluetti DC Hub (Hub D1) Power All My 12V and 24V Devices?
Answer: Yes. The modular Hub D1 connects seamlessly to supply multiple outputs, including dual 100W USB-C ports, USB-A ports, 12V/24V cigarette lighter sockets, and a 50A Anderson plug. It allows you to switch between 12V and 24V modes and control everything via the Bluetti App, making it incredibly easy to run dual fridges and appliances simultaneously.
3. Will the Charger 2 Drain My Vehicle Starter Battery When I’m Parked?
Answer: No, the system is designed to protect your vehicle. The Charger 2 features industry-first Battery Link technology. If it detects that your starter battery is getting too low, it can use up to 800W of reverse power from the connected power station to trickle-charge and gently top it off. You can easily enable these maintenance settings in the Bluetti app.

